
Photographing Waves: Timing, Shutter Speed, and Patience Along the Laguna Beach Coast
Stand along the Laguna Beach coastline for more than a few minutes and you’ll notice something remarkable. No two waves are exactly alike. One crashes against the rocks with explosive energy, while the next slides quietly across the shoreline, leaving behind patterns of foam and flowing water.
That constant change is what makes wave photography both challenging and rewarding. The time of day, direction of light, weather, tide, and surf conditions all influence how a wave appears in the final photograph. They also affect the creative choices available to the photographer.
When the sun is high and the light is bright, creating a long exposure can be more difficult, even with neutral density filters. But that same bright light can be ideal for using a faster shutter speed to freeze water droplets, spray, and the power of a breaking wave.
In softer light, such as early morning or late afternoon, slower shutter speeds become easier to use. The water can take on a smoother, more flowing appearance, creating a completely different mood from the same coastline.
Photographing waves is not simply about pointing the camera at the ocean. It is about understanding timing, reading the light, choosing the right shutter speed, and waiting for the moment when movement, texture, and composition come together.
The photographer is not just recording the ocean — they are choosing how the energy, motion, and feeling of the scene will be remembered.
Timing is Everything
The two images below were photographed with the same camera settings [1/350 second, ISO 280 and f/13], but the timing of the wave created two very different photographs.
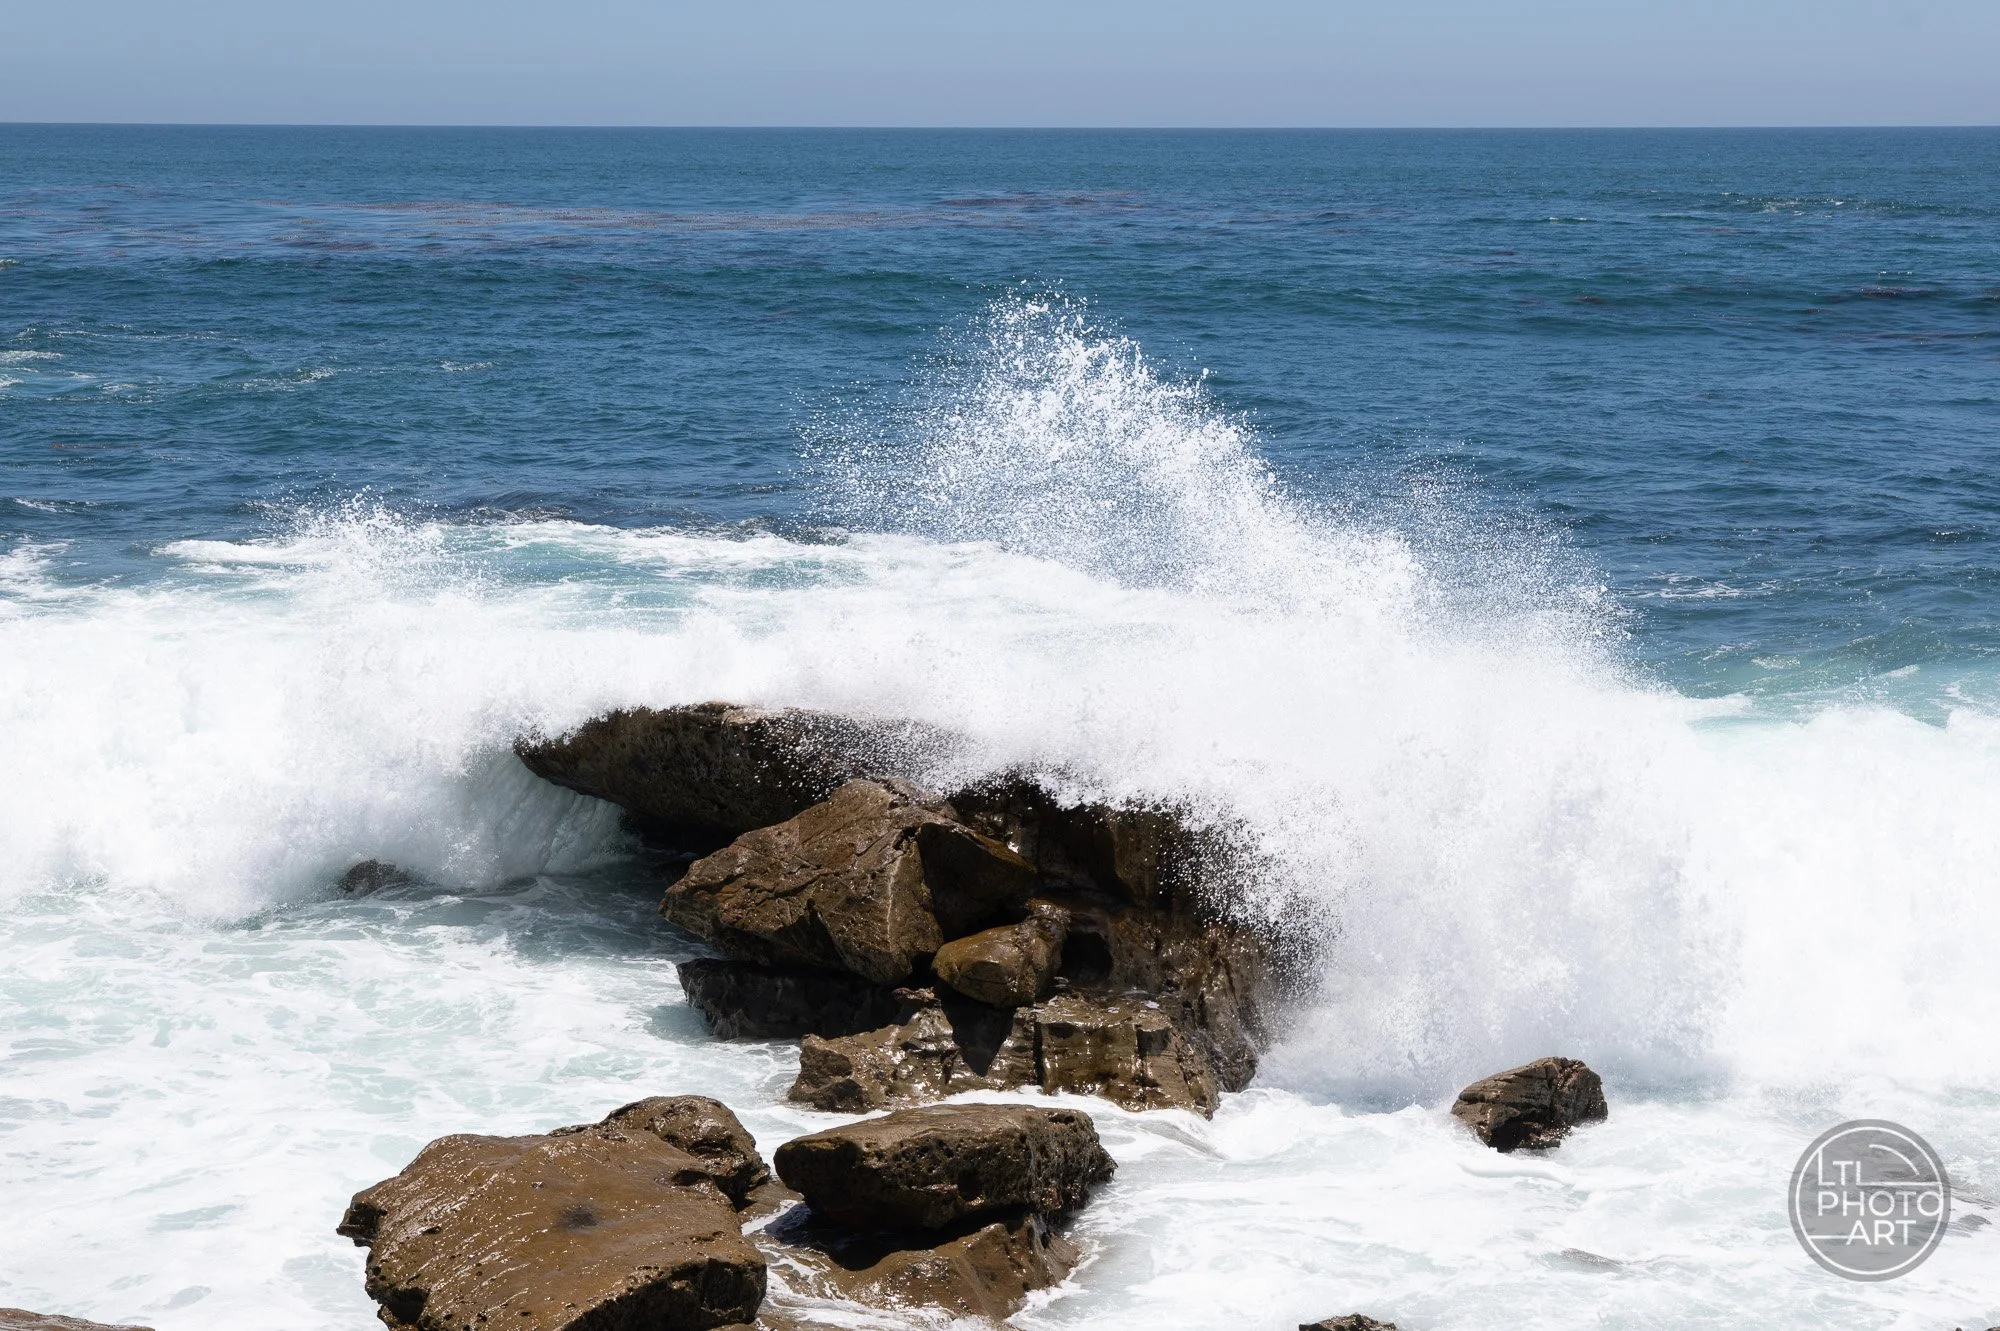
A breaking wave brings energy and drama to the Monument Point composition, showing how timing can transform a coastal photograph even when the camera settings remain the same.
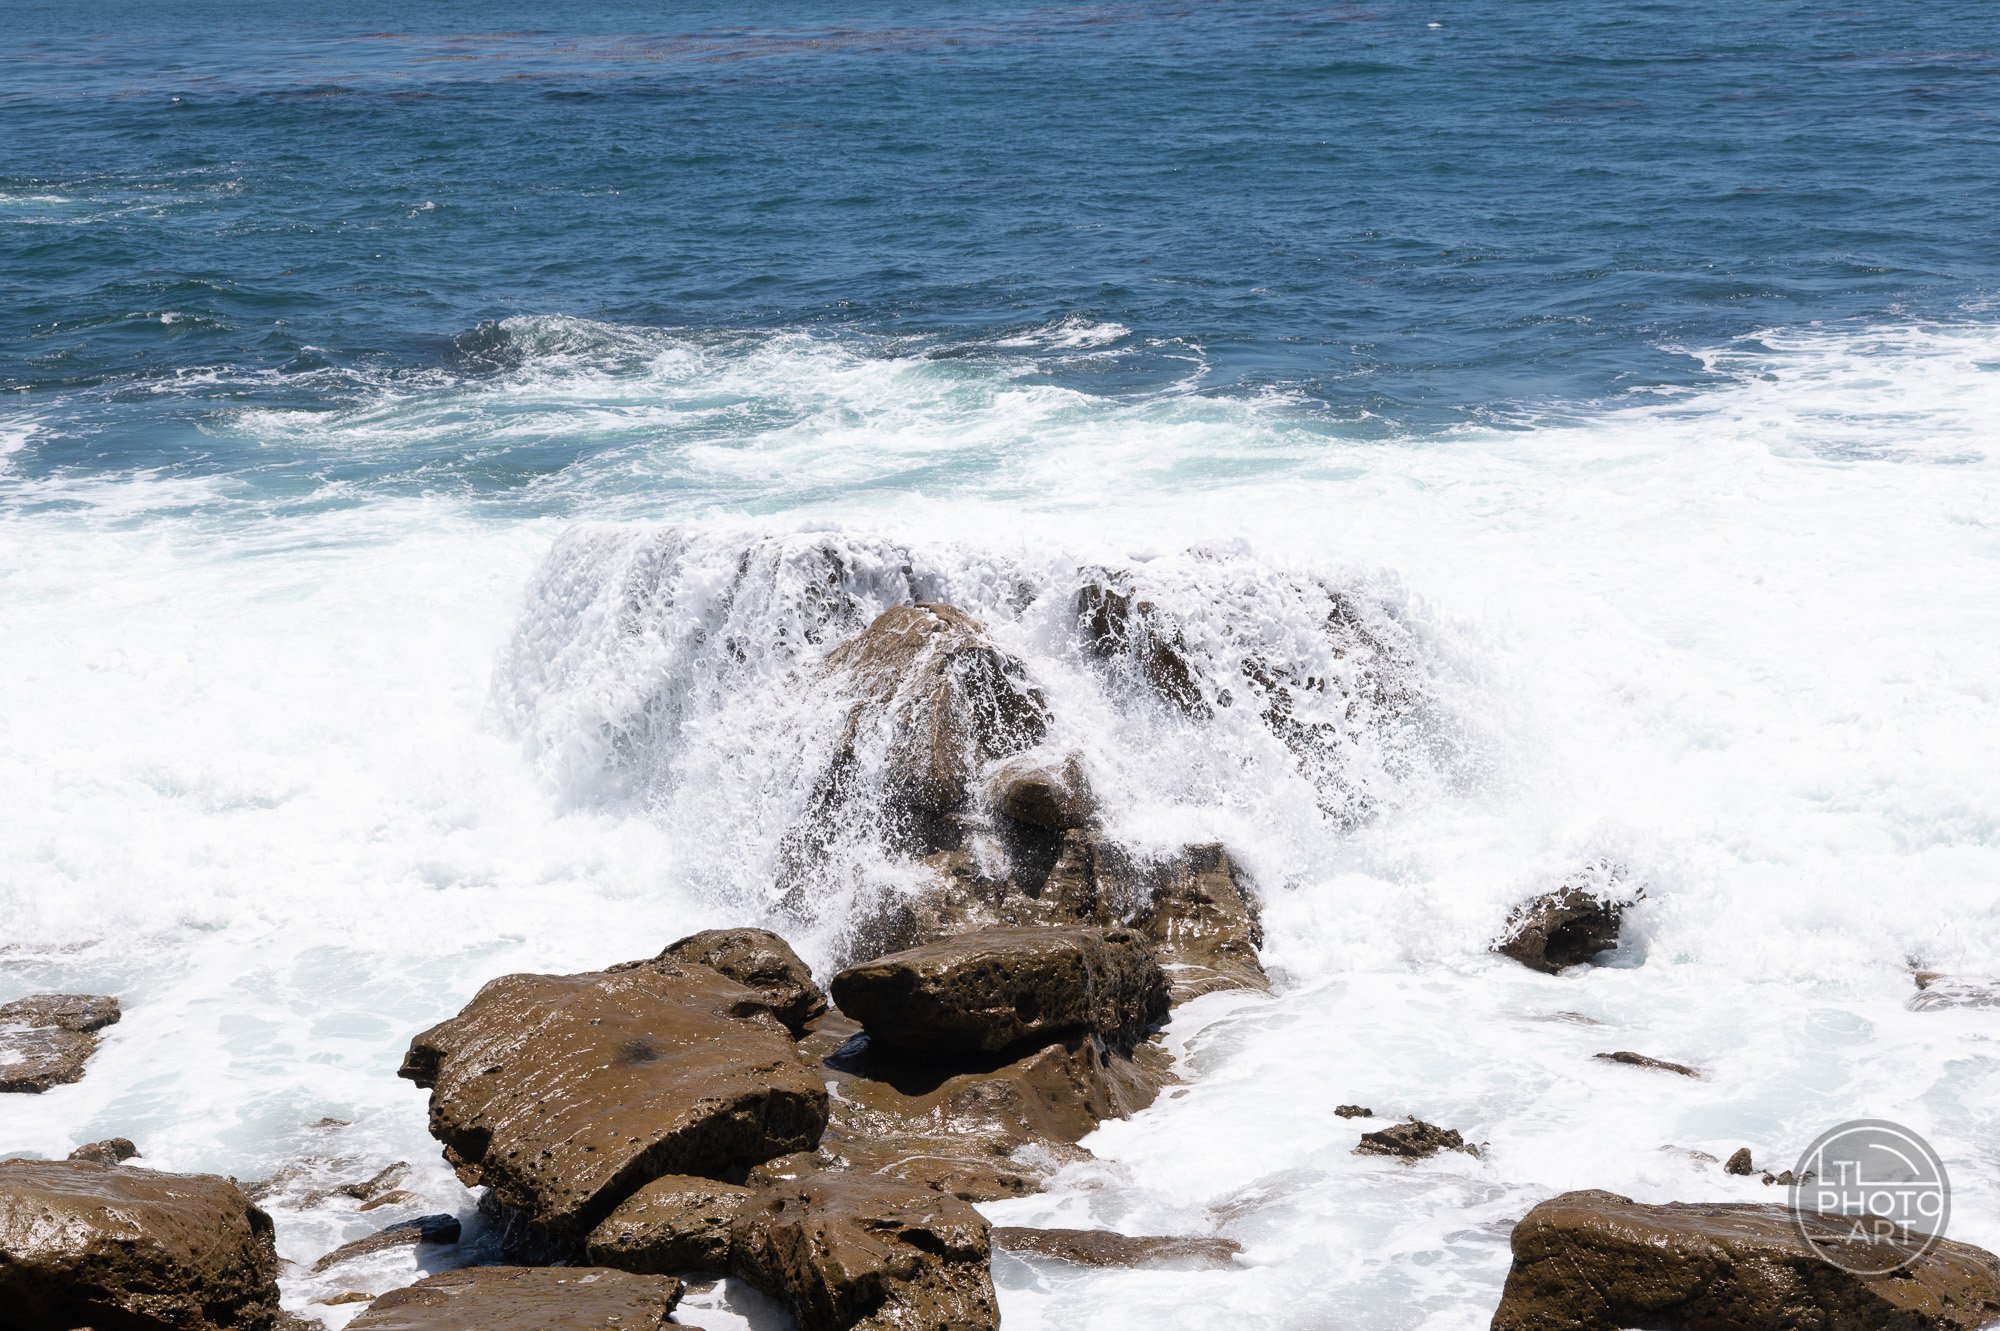
Moments later, the same composition becomes quieter as water cascades over the rocks, creating texture, flow, and detail instead of impact and spray.
Reading the Waves
One of the most valuable skills in wave photography is learning to watch the ocean before raising the camera. Waves often arrive in sets, with larger waves appearing after several smaller ones. Spending a few minutes observing the rhythm of the surf can help you anticipate where the most dramatic water movement may occur.
The goal is not to predict every wave perfectly. Instead, it is to recognize patterns that improve your chances of being ready when an especially strong or photogenic wave arrives.
Choosing the Right Shutter Speed
Light plays a major role in determining the range of shutter speeds available to you. Bright midday light often gives you more room to use faster shutter speeds, while early morning, late afternoon, or shaded conditions may naturally push you toward slower exposures unless you increase ISO or make the aperture bigger.
When photographing waves, shutter speed becomes one of the most important creative decisions.
As a general starting point, 1/250 second can begin to freeze the movement of water, especially when photographing from a distance or working with slower-moving waves. At this speed, the larger shape of the wave may appear sharp, but finer droplets and spray may still blend together.
At around 1/350 second, the water begins to separate more clearly. Spray, droplets, and the edges of breaking waves can become more defined while still preserving a sense of motion and energy. This can be a useful shutter speed when you want the image to feel active without freezing every detail completely.
At 1/500 second or faster, water movement is much more fully frozen. Droplets, splashes, foam, and spray can appear crisp and suspended in the frame. This is ideal when you want to capture the power of a breaking wave or the explosive moment when water hits the rocks.
Slower shutter speeds create a different kind of image. Instead of freezing the wave, they allow water to blur, soften, and flow through the composition. With the right light and, when needed, neutral density filters, longer exposures can transform waves into smooth patterns of motion and create a calmer, more atmospheric interpretation of the coast.
The best shutter speed depends on the story you want the photograph to tell. A fast shutter can emphasize energy and impact. A slower shutter can emphasize rhythm and mood. Neither approach is right or wrong — each one changes how the ocean is remembered.
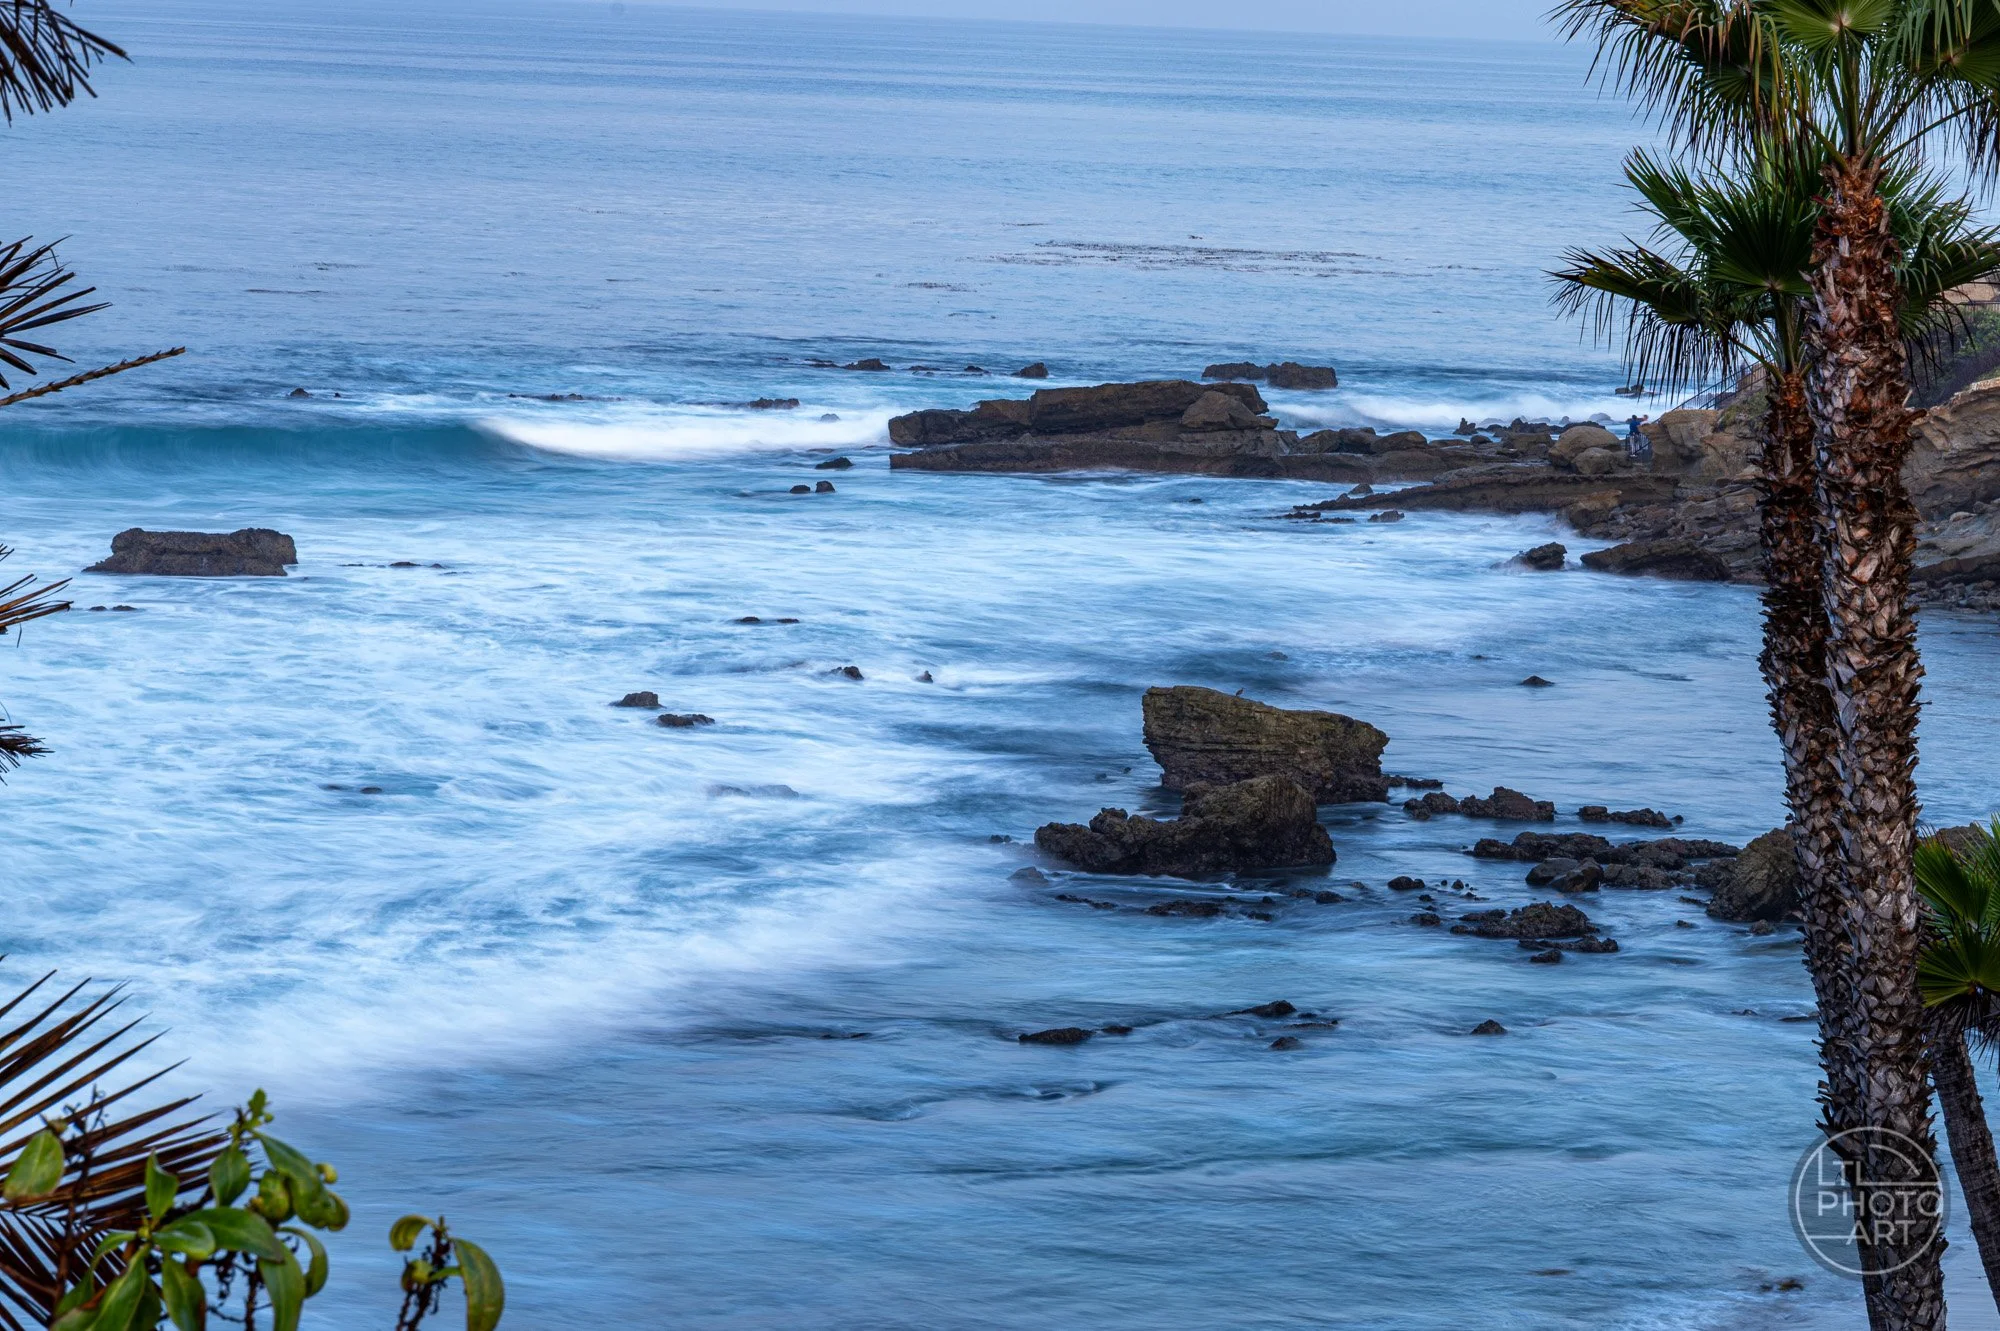
A tighter slow-shutter composition emphasizes waves flowing through the rocks below Monument Point in Laguna Beach.
From a different vantage point, a 1.5-second exposure softens the movement of the waves below Monument Point, creating a calmer, more flowing interpretation of the same coastal setting.
Starting Guide: Wave Photography Shutter Speeds
1/250 sec: Can begin to freeze larger wave movement, especially from a distance or with slower-moving water
1/350 sec: Often provides a useful balance of motion, energy, and detail
1/500 sec or faster: Freezes spray, droplets, and the explosive impact of breaking waves
1/4 to 2 sec: Creates flowing water, motion blur, and softened wave patterns; a tripod is strongly recommended
5+ sec: Creates softer, more atmospheric water effects; a tripod is necessary
Use the lowest ISO possible while still achieving the shutter speed and aperture needed for the photograph. A lower ISO helps preserve detail, cleaner tones, and overall image quality. When using slower shutter speeds, especially around 1/30 second or slower, a tripod becomes important for keeping the camera stable while allowing the water to move through the frame.
Build the Composition Before the Wave Arrives
When photographing waves, the strongest images usually begin before the wave ever reaches the rocks or shoreline. Rather than waiting for the action and then trying to react, build the composition first.
I typically start with a few practice shots to confirm my exposure, check the histogram, and make sure the frame is working. This gives me time to evaluate the scene before the decisive moment arrives. I look at the foreground, the rocks, the direction of the water, the horizon, and the edges of the frame. If something feels distracting or unbalanced, I adjust before the next wave comes in.
Once the composition is set, I can focus on timing.
This is especially important along the coast because waves move quickly and unpredictably. The moment of impact may last only a fraction of a second. If the camera settings, framing, and focus are already in place, I can stay with the rhythm of the water and release the shutter when the wave brings energy into the composition.
The goal is to be prepared before the moment happens. Build the photograph first, then let the ocean complete it.
Stay Safe and Stay Patient
Safety is essential when photographing waves, especially when working at sea level. A strong set can reach much farther than expected, and conditions can change quickly. Before setting up, watch the surf for several minutes, study where the water is reaching, and make sure you have a safe path back.
Footing is also important. Wet rocks can be extremely slippery, and uneven surfaces can make it difficult to move quickly. Many coastal photographers use rubber boots or footwear with strong grip when working around wet sand, shallow water, and rocky areas.
Patience matters just as much as safety. The best wave may not be the first one that arrives. Stay aware, stay balanced, and wait for the moment when the wave, light, and composition come together.
Salt water is another consideration. If ocean spray reaches your lens or filter, avoid immediately wiping it with a dry microfiber cloth. Salt and sand can act like tiny abrasives and may scratch the surface or damage coatings. A protective UV or ND filter can be helpful because it gives you a replaceable surface in front of the lens.
After salt spray, the safer approach is to remove loose grit first, then clean the filter or lens surface with distilled water or proper lens-cleaning solution and a clean cloth. Avoid rubbing dry salt or sand across glass, because it can damage coatings or scratch the surface.
The goal is simple: protect yourself first, protect your equipment second, and give the ocean enough time to create the photograph.
Laguna Beach Coastal Photography Workshop
Photographing waves is one of the most rewarding parts of coastal photography, but it takes practice to understand timing, light, composition, and changing ocean conditions. During the Laguna Beach Coastal Photography Workshop, participants photograph these same coastal scenes while learning how to recognize opportunities, make creative exposure decisions, and create stronger images in real-world conditions.
Whether you are new to coastal photography or looking to refine your skills, the workshop provides hands-on guidance in one of Southern California’s most beautiful coastal environments.